Project Management with GitHub
Use GitHub to host your project, track changes, and collaborate
GitHub is a project management platform centered around git-based version control. While it was originally developed as a useful tool for developers, it is now used by artists, writers, and other non-tech professionals. In fact, Getty uses GitHub to manage all of its publications, as well as Quire itself. We recommend GitHub as a tool for managing your Quire projects (whether collaborating or working solo).
Here are some of GitHub’s main advantages:
- GitHub is free to use.
- It’s a secure platform for hosting your project’s code and creating an electronic backup of your work.
- GitHub saves the entire version history of your project (including deleted files), enabling you to track changes, revert changes, and restore earlier versions.
- You can use GitHub to create test versions of your project and experiment with new ideas before officially incorporating them.
- Github makes working with collaborators easy. You and your colleagues can work in different versions of the project, review and comment on one another’s work, and consolidate any approved changes into the master project.
- In the case of Quire, we also use GitHub to host our community forum where you can ask and answer questions, share ideas, and assist fellow Quire community members.
- For more information, we recommend checking out GitHub Docs to learn by topic, GitHub Glossary to understand key terms, and GitHub Guides for a broad overview. We also encourage you to check out Coding Train’s Git and Github for Poets video series as a helpful primer.
To get started:
- Sign up for a free GitHub account
- Download and install GitHub Desktop, unless you’re familiar with using git from the command-line
- Download and install Git LFS (Large File Storage). Learn more in the Manage Large File Sizes with Git LFS section below.
Next, you will have two options:
- Host Your Project’s Code on GitHub: Create a new repository on GitHub and add a project that lives locally on your computer. (This would be the case if you recently used
quire new.) Please note, you are only hosting your project’s code and not the actual online version of it. - Clone an Existing Project from Github: Copy an existing repository off GitHub to work locally on your computer. This would be the case when collaborating with others who have already created a repository.
Host Your Project’s Code on GitHub
GitHub uses something called “git” to track changes in project files. When you start a Quire project with quire new, it comes already configured as a git repository. (You might have noticed a mysterious .git directory in your folder.) This means your project is ready to be uploaded to GitHub as a new repository.
Open GitHub Desktop and click the upper left-hand corner where it says “Current Repository.” Click “Add” and choose the option to “Add Existing repository…”
Navigate to the project in your and click “Add Repository.”
If there are any items listed in the window’s left-hand pane, you will need to commit them to your project. As this will be your first commit, type “Initial commit” in the Summary field and click the “Commit to master” button.

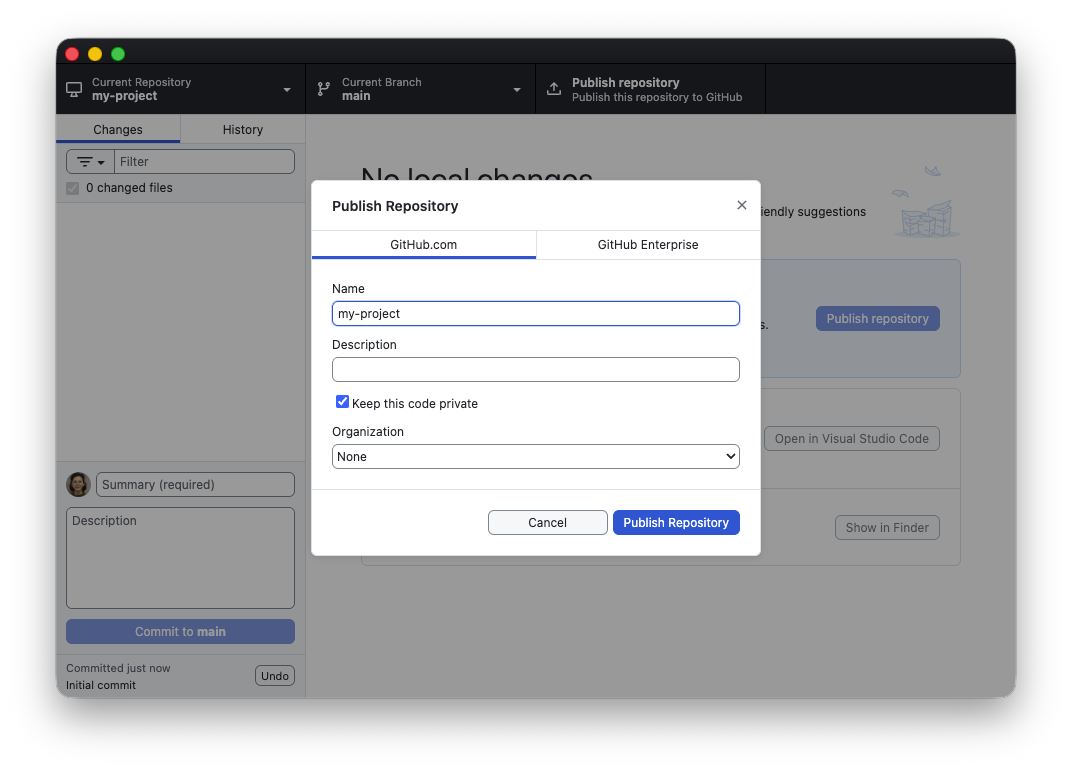
- Click the blue button that says “Publish Repository.” This will push your repository up to GitHub.com. In the pop-window, keep the name as is and add a description if you would like. Then click “Publish Repository.”
Your project code is now on GitHub! To see it, go to Repository > View on GitHub or visit https://github.com/YOUR-USERNAME/YOUR-PROJECT-NAME.
Clone an Existing Project from GitHub
If you are collaborating on a project, and one of your colleagues has already hosted your project code on GitHub, you can clone (or make a copy) of this repository to work on locally.
Click on the upper left-hand corner of GitHub Desktop where it says “Current Repository.” Click “Add” and choose the option to “Clone repository…”
Click the URL menu option and cut and paste the URL for your desired repository. Be sure to choose the local path where you want your project to live on your computer. We recommend creating a GitHub folder in your home directory and storing the project in there. (Alternately, you can copy the project directly from GitHub.com. Navigate to the project on GitHub, click the green “Code” button, select “Open with GitHub Desktop,” and follow the prompts.)
You now have a copy of that project on your computer connected to the original code on GitHub. Before you can collaborate, you will need to either add your colleagues as collaborators or host your project in an organizational GitHub account where everyone is a member. Learn more in the Collaborate with Others Using GitHub section below.
- To view a preview of a Quire project cloned from GitHub, you’ll need to first run the
quire installcommand in your command-line shell. Then runquire previewand navigate to http://localhost:8080/.
- Learn how to take an existing Quire project in GitHub and use it as the basis for a new one in our Use an Existing Quire Project as a Template section. This is especially useful for serial publications such as journals.
Manage Project Changes on GitHub
There are three basic steps for making and managing changes to your project on GitHub:
- Save changes in your text editor
- Commit those changes to the git repository
- Push those commits up to GitHub
Save Changes
Open your project in your text editor (File > Open > [your project name]), make, and save changes. When you go into GitHub Desktop, you should see a list of all the files added, deleted, or edited in the left-hand pane. On the right, you’ll see exactly what changes were made inside each file. Old text will be highlighted in red, while any new text will be highlighted in green. This enables you to compare and review changes.
- Save changes with File > Save (or Command-S on Macs and Control-S on PCs). If working on multiple markdown files, make sure to save each file individually. You will see a little blue dot at the top of the page if there are any unsaved changes.
Commit Changes
At this point, your changes have been saved locally (i.e. on your computer), but they aren’t in the git record of your project yet. For that, you need to make a commit, a small grouping of meaningful changes.
To make a commit, at the bottom left, above where it says description, write a short name summarizing the change you’re making (a longer description is optional) and click the “Commit to master” button. Keep in mind, a key advantage of GitHub is that you can undo your work by reverting commits and returning to earlier versions of your project. Here are a few tips for styling your commits to make that process easier:
- Keep the commit name concise (around 50 characters max), so you can quickly and easily browse them in the future.
- If you need to explain the commit in greater detail, use the description field (around 72 characters max).
- The summary should be a phrase that completes the sentence “This commit will __.”
- Use present/imperative tense, such as “Add contributor names and bios;” “Fix typos in section pages;” or “Change header color.”
When naming commits, think of them as purposefully connected bundles that you could undo at a later date without affecting other areas of your project. Rather than committing all the random changes you made to a single file or everything you did before lunch that day, make small and frequent commits. And remember to commit changes that make sense together.
- Changes are organized by the file in which they were made. Keep this in mind if making multiple types of changes to one file. Use the checkboxes at the lefthand side of your GitHub Desktop window to select which changes will or won’t be included in a given commit. Break your work into individual commits or commits with multiple changes.
Push Changes
Even after saving changes in your text editor and committing them in GitHub Desktop, GitHub still doesn’t know about them. For that, you need to push your commits to GitHub.
Click on the “Push origin” link in the upper-right corner. (If you haven’t committed changes yet, this area will say “Fetch Origin” instead). Pushing can include one or many commits, and you can push as often as you’d like. It’s typically good to do it at least a couple of times a day when actively working on a project.
Now the changes to your project have been successfully saved in GitHub!
Collaborate with Others Using GitHub
One of the main advantages of using GitHub is that it’s an excellent tool for managing projects with multiple people working on them. Once the project is on GitHub and cloned by you and your colleagues, you can all make changes and commits to the same project.
When setting-up a new repository you have two options: you can invite users to become collaborators to your personal repository or groups of people can collaborate across many projects simultaneously with organization accounts. Each has different options for managing settings and permissions.
Clear communication is vital when collaborating with GitHub. If multiple people are working on a project and all are making changes to the same files, there’s a good chance you will run into conflicts. While git is specifically designed to deal with these sorts of issues, it’s important to avoid working on the same sections at the same time.
Create a Branch
A good way to manage users’ changes and avoid conflicts is by using branches. Branches are essentially parallel versions of a project. Users can make changes on their branch without affecting the main version of the project. This allows you to review changes and identify possible conflicts before they are incorporated into your project.
- Before starting a new branch, click the “Fetch Origin” button at the top right. This will pull down any recently merged changes to the master project. That way, when you start a new branch, you are working off the most up-to-date version of your project.
- Navigate to where it says “Current Branch” at the top of your GitHub Desktop window.
- Click the drop-down arrow and select “new branch” to the right of the Filter box.
- Name your branch.
- Select “main” where it says “Create branch based on.” This means you are creating a new branch that runs parallel to the main project. Every time you open the project to work on it, make sure you are working in the correct branch.
Tips for naming branches:
- Keep branch names concise.
- A branch name should be indicative of the work you are doing or who is working on that particular branch.
- Do not use uppercase letters.
- Separate words with dashes (GitHub won’t permit spaces).
Submit a Pull Request
Once you have pushed the changes on your branch, you will be prompted to submit a pull request. This is a request for your collaborators to review and comment on changes.
- Click the blue-button that says “Create Pull Request.” This will take you to GitHub.com.
- Confirm that the branch in the “base” drop-down menu is where you want to merge your changes. In most cases, this will be the master or main branch.
- You can leave the default title or create a new title and description for your pull request.
- On the right-hand side, you will see an option to choose the reviewer(s) you would like to overlook your changes.
- If all your changes are ready for review, click the green-button that says “Create Pull Request.” Or click the drop-down arrow and choose “Create Draft Pull Request” if you are still making changes in this particular pull request.
Review & Merge Changes
Now you have the opportunity to review changes, provide feedback, or request edits. Once the pull request has been approved, you can merge these changes into the master version of your project.
- Navigate to “Pull Requests” on the main page of your repository.
- In the list of pull requests, choose the one you’d like to review.
- Click “+/- Files changed”.
- Hover over the section of text you would like to comment on.
- You will see a blue square with a plus mark pop-up. Write your comments here.
- When you are done commenting click, “Start a Review.” You will have the option to comment, approve, and request changes.
- Once the pull request has been approved, provided there are no conflicts, you will see a green-button that says “merge pull request.” Click this and, voila, your changes are now incorporated.
Manage Third Party Assets with GitHub
If you plan to make your repository visible to the public at some point, you should not commit third-party licensed assets into it, as this can expose those assets to easy, unlicensed use by other people. We recommend either keeping those assets out of the git record completely and managing them locally or adding them in as a secondary repository that always remains private but can be connected to the main repo as a git submodule.
Keeping Assets Out of Git
For anything you do not want to include in git, you can add a listing for it in your project’s main .gitignore file (which you can see when viewing your project in your text editor). You can choose to ignore files by name or by extension, or you can ignore entire directories.
For instance, you might add all your third-party licensed images into a licensed folder in your content/_assets/images/ folder. By adding content/_assets/images/licensed/ to a new line in your .gitignore file, none of those files will be added to the git record and uploaded to GitHub. You’ll only have access to ignored files locally or for collaborators if you provide them copies of the files that they can manually add into their own copies of the repository.
- Items added to your
.gitignorefile that have already been committed to your repository will no longer be tracked going forward but will still exist in your project’s history. Permanently removing files is possible, but much more of a process.
Keeping Assets in a Git Submodule
Where using .gitignore can ensure certain sensitive or third-party files won’t get added into a project repository and thus be uploaded to GitHub, it means you have to manually track and manage those files yourself. Another option is to create a second project repository on GitHub to stay private even while your main project is made public. You include that second repository as a submodule within your main repository.
For instance, you might add all your third-party licensed images into a my-project-licensed-images repository and then link that repository as a submodule into the content/_assets/images/licensed folder of your main project repository. In this way, Quire can still build the site and output files and preview those images as normal. The files will also be under version control with git and connected to your project (so there’s no manual syncing to do), but you’ll be able to keep them private to everyone except your team or collaborators.
There are good directions on working with submodules on GitHub’s blog. Note, however that managing commits to a submodule repository within a repository can be a little tricky, so it’s best not to go this route unless you are comfortable with git and GitHub already or have access to good support.
Manage Large File Sizes with Git LFS
Quire projects are pre-configured to use Git LFS (Large File Storage) to manage all the files in your project’s content/_assets/downloads/ and content/_assets/images/ directories. This is to avoid running into issues with large individual files (GitHub blocks files greater than 100MB) and to keep the overall repository size down to a manageable level. File size issues can be particularly common when it comes to your project’s various output formats, including the PDF, EPUB, and MOBI.
Git LFS is a tool that moves your large files elsewhere and in their place stores references pointing to them in your repo. GitHub then uses these references as a guide to locate your large files. To start, download and install Git LFS (Large File Storage) if you haven’t already done so.
When adding your new Quire project repository to GitHub Desktop, you’ll see a message that says: “This repository uses Git LFS. To contribute to it, Git LFS must first be initialized.” You can click the “Initialize Git LFS” button, and then all files will be tracked and stored using LFS.
GitHub accounts currently include 1GB of free Git LFS storage and bandwidth usage, and more can be purchased as necessary. An additional 50GB costs $5/month.
If you do not want to use Git LFS, delete the .gitattributes file from your project. This file can also be updated manually or by using the git lfs track command from the command line if you want to change or add to what files or folders are being tracked.